|
Project: Create 3D forms of flowers using construction paper.
Materials: Videos: "EngineeringArt/ArtQuest/NPT." and "3 to 5 Paper Flower" scissors, glue, paper clips, blue, purple and green construction paper. Objective: Learn to create 3D forms of paper flowers using construction paper. Procedure: Watch the informative video, "EngineeringArt/ArtQuest/NPT." first to learn about the 3D sculptures. Next watch the instructional video, "3 to 5 Paper Flower," once and then watch it again as you work. Follow along and pause as needed. Try out come up with more ideas for creating different types of flowers. Take a picture of your picture. Post it along with a critique. Be sure to include your name and title your work on your post.
0 Comments
Project: Create a 3D sculptural form of a fish using two paper plates, tagboard and strips of newsprint paper.
Materials: Videos: "Sculpture in the Round?/Art Quest." and "3 to 5 Fish Sculpture" strips of newsprint paper, tagboard, masking tape, glue, paint brush and tempera paint, Objective: Learn that sculptures can be view from many sides and that they have height, length and depth. Next, create a fish sculpture that can be suspended and viewed from many sides.. Procedure: Watch the informative video, "Sculpture in the Round/Art Quest." first to learn about the 3D sculptures. Next watch the instructional video, "3 to 5 Fish Sculpture," once and then watch it again as you work. Follow along and pause as needed. Try out colors for your fish. Take a picture of your picture. Post it along with a critique. Be sure to include your name and title your work on your post.
Project: Paint the silhouette of a seahorse with outlines that are painted with receding values.
Materials: Videos: "'What is Unity?/ArtQuest/NPT." and "3 to 5 Seahorse Unity," white construction paper, tempera paint, paint brush, pallet, a picture of a seahorse or a favorite animal, and a pencil. Objective: Learn about Unity, another principle of design and then create a silhouette of an animal with repeating outlines that go to the edge of the paper which are then painted with values of the same color. Procedure: Watch the informative video, "What is Unity?/Art Quest/NPT." first to learn about Unity. Next, watch the instructional video, "3 to 5 Seahorse Unity," once and then watch it again as you work. Follow along and pause as needed. Try out different shapes of vessels and different colors of paper to create many more sculptural bowls or vases. Take a picture of your picture. Post it along with a critique. Be sure to include your name and title your work on your post.
Project: Creating pattern and rhythm using painted paper cut art.
Materials: Videos: "Finding Patterns at the Zoo/ ArtQuest" and "3 to 5 Bunny Hop" pencil, glue stick, tempera paint, paint brush, sponge, card stock and white construction paper. Objective: Learn about pattern; another principle of design. Paint paper using a combination of colors to create sponge textures for pink bunnies, light blue clouds, and dark blue background. The last grass textures should be painted with an old dry rough brush. Use the cut and paste technique to create a design that shows pattern and rhythm. Procedure: Watch the informative video, "Finding Patterns at the Zoo/ ArtQuest" first to learn about the principle of design; Pattern. Next watch the instructional video, "3 to 5 Bunny Hop," once and then watch it again as you work. Follow along and pause as needed. Take a picture of your picture. Post it along with a critique. Be sure to include your name and title your work on your post.
Project: Sprial Rhythm with Glue
Materials: Videos: "What is Rhythm, " and "3 to 5 Spiral: Rhythm" glue, oil pastel, tempera paint, watercolor paper, watercolor paint, paint brush, and light blue construction paper. Objective: Learn about rhythm; another principle of design. Create a spiral with glue applied from the bottle and then apply paints in a blended style to show rhythmic movement. Procedure: Watch the informative video, “What is Rhythm," first to learn about the principle of design; Rhythm. Next, watch the instructional video, "6 to 8 Spiral: Rhythm," once and then watch it again as you work. Follow along and pause as needed. After you have completed the picture, take a picture of your work. Post it along with a critique. Be sure to include your name and title your work on your post.
Project: Cut and paste a dancing figure in the style of Keith Haring.
Materials: Videos: "Visual Movement - Art Vocab Definition, " "People Project Keith Haring," and "3 to 5 Dance Keith Haring" Pencil, Sharpie,, Red, Yellow and black construction paper. Objective: Learn about movement; another principle of design and the artistic style of Keith Haring. Draw a simple, static figure and then change the figure to show movement. Procedure: Watch the informative video, “Visual Movement - Art Vocab Definition," first to learn about the principle of design; Movement. Next, watch a video about Keith Haring. Finally watch the instructional video, "3 to 5 Dance Keith Haring," once and then watch it again as you work. Follow along and pause as needed. After you have completed the picture, take a picture of your work. Post it along with a critique. Review the critiquing procedure if you need to and rewatch the video on the home page. Be sure to include your name and title your work on your post.
Project: Drawing a cat and adding Emphasis with a Black Sharpie and Oil Pastel
Materials: Videos: "Art - What is Emphasis," and "3 to 5 Cat Oil Pastel." Pencil, Black Sharpie, oil pastels and white construction paper. Objective: Learn about emphasis; another principle of design. Notice that the drawings incorporate symmetrical balance. Animals and people are symmetrical in design. Also learn the blending technique for oil pastels. Procedure: Watch the informative video, “Art - What is Emphasis," first to learn about the principle of design; Emphasis. Next watch the instructional video, "6-8 Eagle Oil Pastel," once and then watch it again as you work. Follow along and pause as needed. Be sure to draw multiple copies of the same drawing or make photocopies. These pictures will be used in lesson 15. Take a picture of your work. Post it along with a critique. Review the procedure by rewatching the video on the home page on critiquing. Be sure to include your name and title your work on your post. 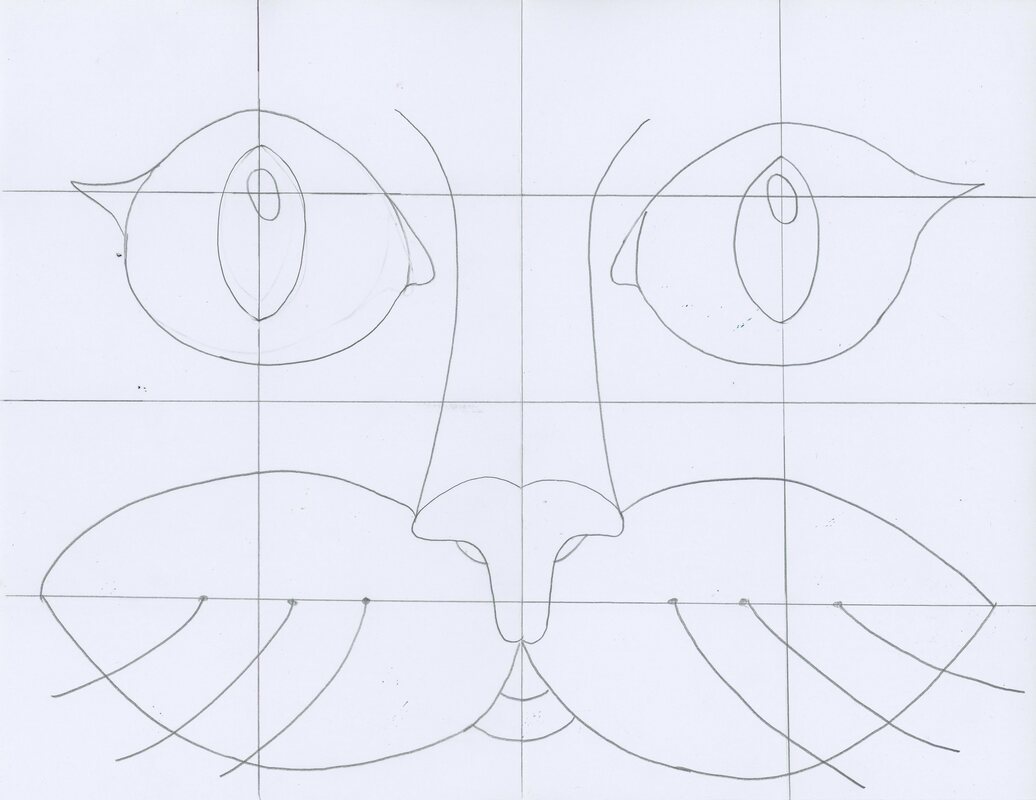
Project: Contrast painting of owl
Materials: Videos: "Contrast in Art," "Contrast Owl," tempera paint, paintbrush, pencil, scissors, tape and 9 X 12 white paper. Objective: Learn about contrast and paint a picture of an owl in front of the moon to show contrast. Also learn to blend purple and black to make a shade that shows gradation. Next learn to paint texture by mixing white and black. Finally, paint a silhouette of a tree with an owl by using a tree branch as a stencil. Procedure: Watch the informative video, “Contrast," and then watch the instructional video, "Contrast Owl," once and then watch it again as you work. Follow along and pause as needed. Take a picture of your work. Post it along with a critique. Review the procedure by rewatching the video on the home page on critiquing if you need to. Be sure to include your name and title your work on your post.
Project: Watercolor Symmetrical Balance Design.
Materials: Videos: "Balance," "Watercolor Balance," Watercolor paint, markers, Sharpie, pencil, scissors and 9 X 12 white paper. Objective: Learn about the different types of Balance, one of the Principles of Design. Create a symmetrical design and use Sharpies, markers and watercolor to make it colorful. Procedure: Watch the informative video, “Balance," and then watch the instructional video once and then watch it again as you work. Follow along and pause as needed. Take a picture of your work. Post it along with a critique. Review the procedure by rewatching the video on the home page on critiquing if you need to. Be sure to include your name and title your work on your post.
Project: Cake Tempera with Oil Pastel on Heart with patterns
Materials: Video: "K2 Heart V2 S2 L1," white paper, pencil, oil pastel, paint brush, cake tempera Objective: Cut a heart and use it as a stencil. Create patterns and utilize the oil resist method using oil pastels and cake tempera. Procedure: Watch the instructional video, “K2 Heart V2 S2 L1," once and then watch it again as you work. Follow along and pause as needed. Take a picture of your work. Post it along with a critique. Review the procedure by rewatching the video on the home page on critiquing. Be sure to include your name and title your work on your post. |
Archives
July 2019
Categories |
 RSS Feed
