|
Project: Cut and Paste Mondian
Materials: Videos: "The Theory of Neoplasticism," "Piet Mondrian for Kids," "6 to 8 Mondrian," glue, scissors, templet printout, white, black, red, yellow, and blue construction paper. Objective: Learn about Piet Mondrian and Neoplasticism then create a cut and paste design in the same style Procedure: Watch two informative vides then watch instructional video, “6 to 8 Mondrian," once and then watch it again as you work. Follow along and pause as needed. Take a picture of your work. Post it along with a critique. Review the procedure by rewatching the video on the home page on critiquing. Be sure to include your name and title your work on your post.
0 Comments
Project: Painting texture on pater to cut and paste a picture of a toucan in the jungle.
Materials: Video: "K2 S1 V2 L9 Values of Sky, Trees and Snow," white paper, paint brush, blue, and black tempera paint. Dark blue, medium blue, light blue, and white oil pastel. Objective: Learn to paint texture for sky, jungle plants and a toucan's beak. Paint various values of green and blue. The more painted textured papers, the better. Use the textured paper to assemble a jungle scene featuring a toucan. Try out several arrangements before gluing down the paper. Procedure: Watch the video, "Birds of Paradise: Toucan - National Geographic," then watch the instructional video, “6 to 8 V2 S1 L9 Toucan Cut and Paste," once and then watch it again as you work. Follow along and pause as needed. Take a picture of your work. Post it along with a critique. Review the procedure by rewatching the video on the home page on critiquing. Be sure to include your name and title your work on your post. 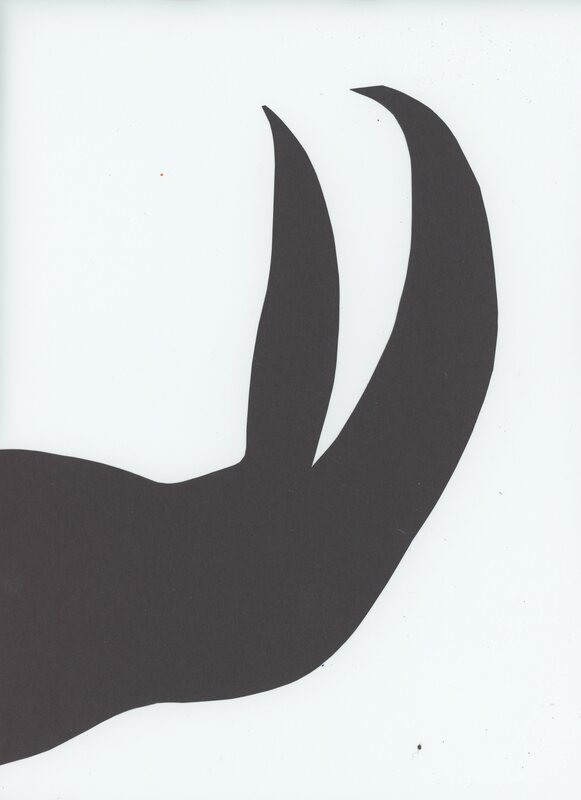
Project: Sky in Value with Raven Painting
Materials: Video: "6 to 8 Sky in Value with Raven," white & black construction paper, scissors, pencil paintbrush, blue , white and black tempera paint. Objective: Learn to paint a sky with values and a silhouette of a bird. Procedure: Watch the instructional video, “6 to 8 Sky in Value with Raven," once and then watch it again as you work. Follow along and pause as needed. Take a picture of your work. Post it along with a critique. Review the procedure by rewatching the video on the home page on critiquing. Be sure to include your name and title your work on your post.
[object Object]
Project: Design Jelly fish of watercolor textured paper
Materials: Video: "K2 L7 V2 S1 Jellyfish Part 2," oil pastel, pictures of a jellyfish for visual reference, pencil, oil pastel, watercolor paint, paint brush and watercolor paper with watercolor paint textured on it. Objective: Learn how to draw three jellyfish with oil pastel, make an oil pastel and graphite transfer sheet. Procedure: Watch the instructional video, “K2 L7 V2 S1 Jellyfish Part 2," once and then watch it again as you work. Follow along and pause as needed. Take a picture of your work. Post it along with a critique. Review the procedure by rewatching the video on the home page on critiquing. Be sure to include your name and title your work on your post.
: Project: Paint texture on watercolor paper, create several drawings of jellyfish, combine your favorite designs using the graphite transfer method.
Materials: Video: "K2 L6 V2 S1 Jellyfish: Part 1," watercolor paint, watercolor paper, plastic wrap, pencil, paint brush, and salt. Objective: Learn how to create watercolor texture using salt and plastic wrap. Draw several jellyfish designs and transfer your best ideas using the graphite transfer method. Procedure: Watch the instructional video, “K2 L6 V2 S1 Jellyfish: Part 1," once and then watch it again as you work. Follow along and pause as needed. Take a picture of your work. Post it along with a critique. Review the procedure by rewatching the video on the home page on critiquing. Be sure to include your name and title your work on your post.
Project: Cross Contour of Branches Part 2
Materials: Video: "6-8 L5 V2 S1 Cross Contour Branches Part 2," pencil, black sharpie, brown water base markers, paint brush, water cup with water and white paper. Objective: Learn to draw cross contour lines using branches as stencils. Learn that cross contour lines drawn correctly along with the technique of pulling color give an illusion of form. Procedure: Watch the instructional video, “6-8 L5 V2 S1 Cross Contour Branches Part 2” once and then watch it again as you work. Follow along and pause as needed. Take a picture of your work. Post it along with a critique. Review the procedure by rewatching the video on the home page on critiquing. Be sure to include your name and title your work on your post.
Project: Cross Contour Line of Branches
Materials: Video: "6-8 L4 V2 S1 Cross Contour Branches," pencil, black sharpie, brown water base marker, branches and white paper. Objective: Learn to draw cross contour lines using branches as stencils. Learn that cross contour lines drawn correctly give an illusion of form. Procedure: Watch the instructional video, “6-8 L4 V2 S1 Cross Contour Branches” once and then watch it again as you work. Follow along and pause as needed. Take a picture of your work. Post it along with a critique. Review the procedure by rewatching the video on the home page on critiquing. Be sure to include your name and title your work on your post.
Project: Color Wheel Design
Materials: Video: "6-8 L3 V2 S1 Color Wheel Design," watercolor paint, black sharpie, silver Sharpie and gold Sharpie, paint brush, circle template downloaded (from this page) and white paper. Objective: Learn to paint a color wheel with a silhouette of a design in front of it. Procedure: Watch the instructional video, “6-8 L3 V2 S1 Color Wheel Design” once and then watch it again as you work. Follow along and pause as needed. If you are interested in creating a different silhouette, be sure to find or take a reference picture and complete a rough draft first. Take a picture of your work. Post it along with a critique. Review the procedure by rewatching the video on the home page on critiquing. Be sure to include your name and title your work on your post.
Project: Paint a Birch Tree
Materials: Video: "6-8 L2 V2 S1 Birch Tree," tempera paint, sponge, paint brush, palette, strips of tag board, tree branch and white paper. Objective: Learn to paint a birch tree using a sponge, stick, strips of tag board, paint brush and tempera paint. Procedure: Watch the instructional video, “6-8 L2 V2 S1 Birch Tree” once and then watch it again as you work. Follow along and pause as needed. Take a picture of your work. Post it along with a critique. Review the procedure by rewatching the video on the home page on critiquing. Be sure to include your name and title your work on your post. Project: Collect fall leaves to create leaf rubbings on bands of parallel lines Materials: Video: "6-8 V2 L1 Warm Leaves," watercolor paint, ruler, paint brush, leaves, markers, Sharpie, white oil pastel and white paper. Objective: Create a leaf rubbing using white oil pastel, Sharpie and watercolor paint. Create a design with warm fall colors for the leaf and cool colors for the bands of parallel lines in the background. Draw, rub, paint, and color to create a design with texture in warm and cool colors. Procedure: Watch the instructional video, “6-8 V2 L1 Warm Leaves” once and then watch it again as you work. Follow along and pause as needed. Take a picture of your work. Post it along with a critique. Watched the critiquing video on the home page to review the procedure. Be sure to include your name and title your work. |
AuthorWrite something about yourself. No need to be fancy, just an overview. Archives
January 2019
Categories |
||
 RSS Feed
