|
Project: Create a 3D Fish sculpture using a paper mâché technique that can also be used as a piñata.
Materials: Videos: "Engineering Art/ArtQuest" and "6 to 8 3D Fish," pencil, card stock paper, newsprint, balloon or beach ball, Elmer's Glue All, coat hanger, sponge, paintbrush, paint, masking tape and the center or a masking tape roll. Objective: Learn that sculptures can serve a purpose. First, learn how to create a framework and then learn to apply strips of paper coated with glue to create a paper mâché sculpture the can be used as a piñata. Procedure: Watch the informative video, "Engineering Art/ArtQuest" first to learn about a different kind of sculpture.. Next, watch the instructional video, "6 to 8 3D Fish," once and then watch it again as you work. Follow along and pause as needed. Take a picture of your picture. Post it along with a critique. Be sure to include your name and title your work on your post.
0 Comments
Project: Use tints and shades of one color to create unity in a painting
Materials: Videos: "Unity - Art Vocab Definition" and "6 to 8 Unity Magy 2," pencil, photograph, graphite transfer sheet, pen, scotch tape, tempera paint, paint brush, pallet and white construction paper. Objective: Learn about unity; another principle of design and the procedure for mixing tints and shades. Paint continuous contour lines of a silhouette of two figures from a photograph. The lines should be equal distance apart and each space between the lines should get lighter in value, farther it is from the subject/silhouette. Procedure: Watch the informative video, "Unity - Art Vocab Definition" first to learn about the principle of design; unity. Next watch the instructional video, "6 to 8 Unity Magy 1," once and then watch it again as you work. Follow along and pause as needed. Take a picture of your picture. Post it along with a critique. Be sure to include your name and title your work on your post.
Project: Use tints and shades of one color to create unity.
Materials: Videos: "What is Unity?/ArtQuest" and "6 to 8 Unity Magy 1," pencil, photograph, graphite transfer sheet, pen, tempera paint, scotch tape and white construction paper. Objective: Learn about unity; another principle of design and the procedure for mixing tints and shades. Draw continuous contour lines of a silhouette of two figures from a photograph. The lines should be equal distance apart. Procedure: Watch the informative video, “What is Unity/ArtQuest" first to learn about the principle of design; unity. Next, watch the instructional video, "6 to 8 Unity Magy 1," once and then watch it again as you work. Follow along and pause as needed. Take a picture of your picture. Post it along with a critique. Be sure to include your name and title your work on your post.
Project: Tessellation of waves with diagonal lines to show pattern and rhythm
Materials: Videos: "Finding Patterns at the zoo/ArtQuest" and "6 to 8 Wave Tessellation," pencil, 3 X 5 note card, ruler, sharpie, scotch tape and white construction paper. Objective: Learn about pattern; another principle of design and the process for creating a tessellation. Also learn to equally space diagonal lines by connecting measured marks from the top to the bottom of the paper at specific intervals. Procedure: Watch the informative video, “Finding Patterns at the zoo/ArtQuest" first to learn about the principle of design; pattern. Next watch the instructional video, "6 to 8 Wave Tessellation," once and then watch it again as you work. Follow along and pause as needed. Take a picture of your picture. Post it along with a critique. Be sure to include your name and title your work on your post.
Project: Draw tessellation of waves with diagonal lines showing rhythm and pattern.
Materials: Videos: "What is Rhythm" and "6 to 8 Waves Tessellation: Rhythm Part 1," pencil, Sharpie, ruler, 3 X 5 lined index card, several sheets of scratch paper and white paper. Objective: Learn about rhythm; another principle of design. Notice that the design is interlocking from side to side and top to bottom. Procedure: Watch the informative video, “What is Rhythm," first to learn about the principle of design; Rhythm. Next watch the instructional video, "6 to 8 Wave Tessellation: Rhythm Part 1," once and then watch it again as you work. Follow along and pause as needed. Take a picture of your work. Post it along with a critique. Review the procedure by rewatching the video on the home page on critiquing. Be sure to include your name and title your work on your post.Project: Tessellation of waves with diagonal lines to show pattern and rhythm
Project: Oil resist design of a turtle in water with watercolor paint
Materials: Videos: "Visual Movement - Art Vocab Definition " and "6 to 8 Turtle: Movement" Pencil, Sharpie, oil pastels, watercolor paint and white construction paper. Objective: Learn about movement; another principle of design. Notice that the drawings incorporate symmetrical balance as well as movement. Animals and people are symmetrical in design. Also learn the oil resist and the rubbing/transfer technique using oil pastels. Procedure: Watch the informative video, “Visual Movement - Art Vocab Definition," first to learn about the principle of design; Movement. Next watch the instructional video, "6 to 8 Turtle: Movement," once and then watch it again as you work. Follow along and pause as needed. After you have completed the turtle painting, take out the copies of the eagle from lesson 14 and see if you can draw lines that show more movement and incorporate the oil resist technique. Take a picture of your work. Post it along with a critique. Review the procedure by rewatching the video on the home page on critiquing. Be sure to include your name and title your work on your post.
Project: Drawing an Eagle and adding Emphasis with a Black Sharpie and Oil Pastel
Materials: Videos: "Art - What is Emphasis," and "6 to 8 Eagle Oil Pastel." Pencil, Black Sharpie, oil pastels and white construction paper. Objective: Learn about emphasis; another principle of design. Notice that the drawings incorporate symmetrical balance. Animals and people are symmetrical in design. Also learn the blending technique for oil pastels. Procedure: Watch the informative video, “Art - What is Emphasis," first to learn about the principle of design; Emphasis. Next watch the instructional video, "6-8 Eagle Oil Pastel," once and then watch it again as you work. Follow along and pause as needed. Be sure to draw multiple copies of the same drawing or make photocopies. These pictures will be used in lesson 15. Take a picture of your work. Post it along with a critique. Review the procedure by rewatching the video on the home page on critiquing. Be sure to include your name and title your work on your post. 
Project: Creating a Cut Art
Materials: Videos: "Henri Matisse: The Cut-Outs," and "6 to 8 Matisse Cut Art." Scissors, glue, light blue, dark blue and white construction paper. Objective: Procedure: Watch the informative video, “Henri Matisse: The Cut-Outs," first to learn about Matisse. Then look at the original cut art, "Polinesia, The Sky," 1947 by Matisse. Next watch the instructional video, "6-8 Matisse Cut Art," once and then watch it again as you work. Follow along and pause as needed. Take a picture of your work. Post it along with a critique. Review the procedure by rewatching the video on the home page on critiquing. Be sure to include your name and title your work on your post. 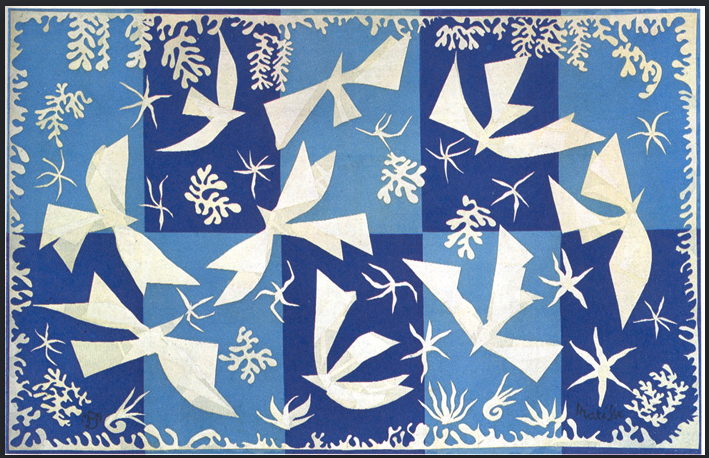
Project: Painting a Night Sky with Northern Lights
Materials: Video: "Northern Lights," tempera paint (or acrylic paint on canvas), pencil, 12X16 white paper, paint brush and reference pictures. Objective: Learn to paint a night sky, then create bands of green that show movement. Paint a gradation of green values and complete the design with various possible silhouettes to show emphasis and contrast. Procedure: Watch the instructional video, “Northern Lights," once and then watch it again as you work, after completing a rough draft. Look for reference images that can be used to assist in finding the type of silhouette that could be included in the painting. Also look at other pictures of northern lights to design the path of the lights. Transfer the rough draft drawing to the final draft paper or canvas. Follow along and pause as needed. Take a picture of your work. Post it along with a critique. Review the procedure by rewatching the video on the home page on critiquing. Be sure to include your name and title your work on your post.
Project: Create patterns and blend oil pastel on a Heart design
Materials: Video: "6 to 8 Heart PatternV2 S2 L1," white paper, pencil, oil pastel, and black sharpie Objective: Cut a heart and use it as a stencil. Create patterns using a sharpie and blend values of oil pastel to show value, emphasis, contrast & texture.. Procedure: Watch the instructional video, “6 to 8 Heart V2 S2 L1," once and then watch it again as you work. Follow along and pause as needed. Take a picture of your work. Post it along with a critique. Review the procedure by rewatching the video on the home page on critiquing. Be sure to include your name and title your work on your post. |
AuthorWrite something about yourself. No need to be fancy, just an overview. Archives
May 2019
Categories |
 RSS Feed
